How to Test a 12V Battery with a Multimeter?
- 01 Jul, 2023
A Quick Guide & Video of how to test a 12V battery with a multimeter
- Connect the red probe to the VΩmA port and connect the black probe to the COM port.
- Turn your multimeter to DC voltage mode (A "V" with a line below or above it) and choose a voltage range closest to 12V, in our case it's 20V.
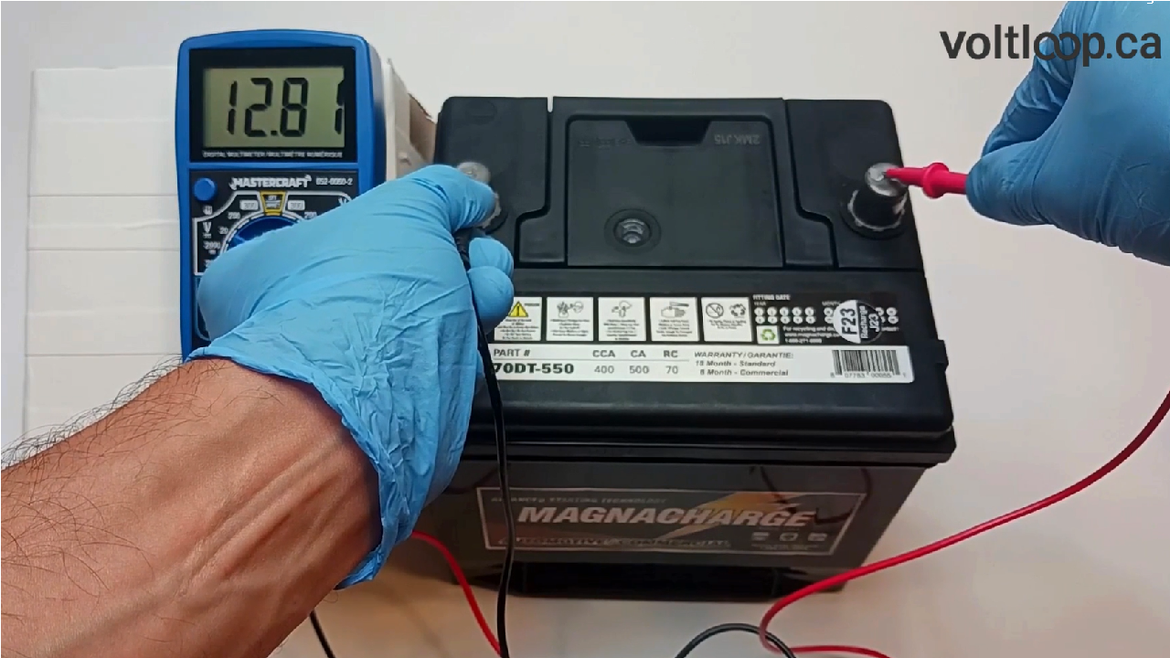
- Connect the positive (red) probe of the multimeter to the positive terminal of the 12V battery and the negative (black) probe to the negative terminal.
- A fully charged 12V battery should have a voltage reading of 12.6-12.8 volts.
- At 12.4 to 12.6 volts, the 12V battery is approximately 75% charged and in good condition.
- If the 12V battery voltage falls below 12.4 volts, it is drained and may need to be recharged or replaced.
Welcome to our in-depth blog for testing a 12V battery using a multimeter. In this blog, we will walk you through the step-by-step process of testing a 12V battery with a multimeter and leave you with the knowledge you need to correctly interpret your multimeter findings. So, let's have a look at battery testing to ensure your 12V battery is in good operating order.
What do you need to test a 12V battery?
- Multimeter
- Safety gloves and goggles
- 12V battery

Step 1: Safety First!
Priorities safety before you begin testing. Grab some safety gloves and goggles to protect yourself from any potential battery hazards. Always priorities safety!
Step 2: Multimeter Probes and Ports
Let's start with a very important components of your trusted multimeter: the probes and ports. We'll make certain those connections are rock-solid!
When testing a 12V battery, connect the red probe cable to the VΩmA port and the black probe cable to the COM port.
The VΩmA Port: This is the port to which the red probe connects. It's your go-to port for monitoring voltage, resistance, and current. It is the primary port you will utilize when testing a 12V battery.
The COM Port: This is the port where the black probe connects. It serves as the reference point, the ground for all measurements. Think of it as the multimeter's anchor.
By inserting the red probe into the VΩmA port and the black probe into the COM port, you're ready to start on a 12V battery voltage-measuring voyage!

Step 3: Set the Stage for Voltage
Now it's time to set the stage for voltage measurement. We want accuracy and precision, my friend!
Choose the appropriate mode: On your multimeter's dial or display, look for the "V" symbol (with a straight line below or above). That is the key to determining direct current voltage. It's like a secret code for uncovering voltage secrets on your multimeter!
Select the appropriate range: Choose a voltage range greater than 12 volts for accurate readings. If you have a choice between 20V, 200V, and 300V, go with the 20V range. The basic rule is to choose the voltage that is greater than and closest to 12V.
Accuracy and precision are the names of the game here. Selecting the right measurement mode and voltage range ensures your multimeter can handle the task without breaking a sweat.

Now, let's connect to the 12V battery! It's time to start making those connections and reading the voltage like a pro.
Identify the terminals: Find the "+" and "-" symbols on your 12V battery. These symbols point you in the right direction.
Take the red probe, the positive lead of your multimeter, and connect it to the battery's positive terminal (the one with the "+"). Make sure it's snug and secure for a proper reading.
Now, grab the black probe, the negative lead, and attach it to the battery's negative terminal (the one with the "-"). This connection is crucial, so make it is strong and secure.
Remember, polarity is key here. Red probe to the positive terminal, black probe to the negative terminal. Mix them up, and you'll get a wild and inaccurate voltage reading. We don't want that!
Step 5: Voltage Revelation
The moment of truth has arrived. Read the voltage displayed on your multimeter's screen and brace yourself for the verdict.
What should a 12V battery read on a multimeter?
- 12.6 to 12.8 volts: Your 12V battery is fully charged and in good condition.
- 12.4 to 12.6 volts: Your 12V battery is approximately 75% charged and still in decent condition.
- Below 12.4 volts: Your 12V battery is discharged and may require recharging or replacement.

Step 6: Load Testing (Optional)
Load testing provides a more accurate representation of the battery's performance in real-world scenarios. However, additional tools, such as a battery load tester, are required. If you have a load tester, run the test according to the manufacturer's instructions. Otherwise, you can skip this step.
Step 7: Examine and Clean
Take a good look at your battery and search for any signs of deterioration, corrosion, or leakage. We're like battery detectives here, solving the mystery of your battery's health! If you spot any dusty or corroded terminals, don't panic. It's a common issue. Just grab a wire brush or sandpaper and give those terminals a gentle cleaning.
Step 8: Decoding the Results and Taking Action
It's time to decipher the information provided by your multimeter. The voltage measurements you acquired are like secret signals that show the status and performance of your battery. Let's figure them out together!
Voltage within the Expected Range: If the voltage reading falls within the expected range, typically between 12.6 and 12.8 volts for a fully charged 12 volt battery, your battery aced the test! This means your battery is likely in good working order, ready to unleash its power and keep your devices running smoothly.
Lower Voltage Readings: If the voltage reading on the multimeter is much lower than the normal range, you may be dealing with a faulty or exhausted battery. But don't jump to conclusions just yet. A lower voltage reading does not always indicate that your battery is faulty. It's like a friendly warning sign that something might be up. It's time to investigate further!

Signs of Instability: If the voltage appears to be on a rollercoaster, fluctuating wildly during the test, this is a red flag. It's as if your battery is saying, "Houston, we have a problem." Voltage instability can signal deeper problems such as a damaged cells, internal short circuits, or other unseen internal flaws. It's time to get serious and take action!
Next Steps for Weak or Faulty Batteries: If the voltage readings are much lower than expected or show signs of instability, don't panic. We've got a few options up our sleeves.
Recharging: If your battery is discharged but still within its operational lifespan, we can give it a chance to bounce back. Grab an appropriate charger, follow the manufacturer's guidelines, and recharge that baby. Once it's charged up, test its voltage again to see if it reaches the expected range. Fingers crossed!

Replacement: Sometimes, batteries just don't want to cooperate. If your battery consistently shows low voltage readings or exhibits other signs of being compromised, it might be time to replace it. Make sure you bring your old 12V battery to a registered recycling depot when you replace it.
View our 12V battery collection
Professional Consultation: In some cases, batteries can be a real puzzle, especially when dealing with complex battery systems or if you're unsure about their condition. That's when it's wise to call in the pros.
Remember, assessing your battery's health is like putting together a jigsaw puzzle. Voltage readings are just one piece of the puzzle. Other factors like capacity, internal resistance, and load testing might also be necessary for a complete evaluation. So, stay curious and keep exploring the electrifying world of batteries!


I have a small magnacharge lawn mower battery…I charged it up and it says 13.02 volts on my voltmeter…is that OK to use?
thanks
Noel: the “10A” port is used with pins connected to “COM” (black – minus) and “10A” (red – plus) to measure current. If an instrument has “10A” stamped next to a port that’s the maximum current the instrument can live with, exceeding that may at least blow a fuse in the instrument or at worst ruin it. Like with voltage measurements where the max expected voltage is a “safe guess” and the instrument is set above that value, same applies for current measurements.
Many thanks. That was most helpful. However, when do you use the other red port on the multimetre marked “10A”.
Cheers
Noel
So far so good